Table of Contents
- Base Installation
- Prerequisites
- Installation of Keycloak
- Configuration of Keycloak
- Configuration of the Olvid Plugin
- Upgrading
- Additional Configuration
- Configuration of an External IdP
- Using LDAP User Federation
- x509 Client Certificates Authentication
- Configure Olvid via an MDM
- Using the management console
- Use the Olvid Management Console
- Misc.
- Changelog
Using LDAP User Federation
LDAP user federation allows importing users (and groups) from an LDAP-compatible directory (like Active Directory) already in place in your company. User attributes to import into Keycloak can be customized with mappers. When a user authenticates, the password they enter will be sent to the LDAP server to be validated, meaning the passwords are NOT imported/stored in Keycloak. Same goes for group members: each time Keycloak needs to list members of a group imported from LDAP, it will query the LDAP server to get the most up-to-date user list.
1. Adding user federation
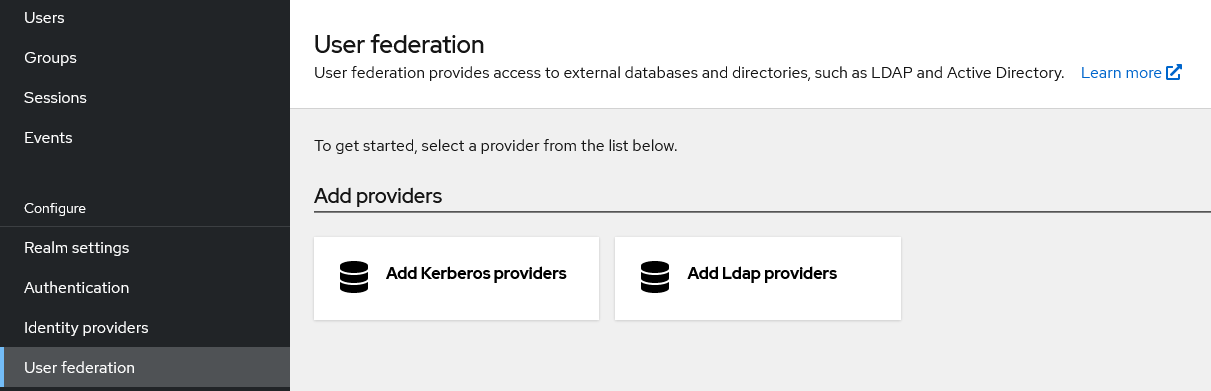
Open the Keycloak administration console and select your Olvid user realm. This is the realm you want to add user federation to.
Select “User federation” in the left menu and click “Add Ldap providers”. The use of user federation through a Kerberos provider is not documented here.
Now, you need to fill in all the required fields:
- Choose a “UI display name” for this user federation provider (“ldap” is fine)
- Pick the right “Vendor”: this will pre-configure some fields in the “LDAP searching and updating” section.

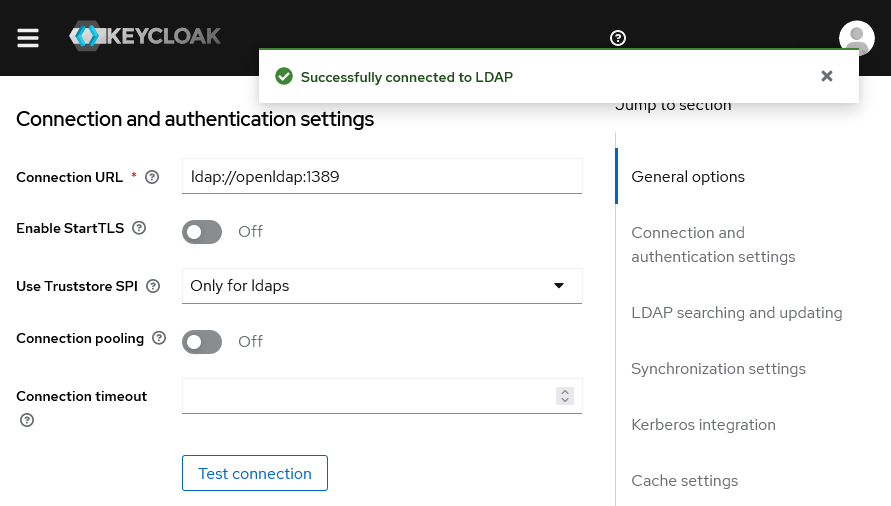
- Now fill in the “Connection and authentication settings”: entering the “Connection URL” may be enough is using plain LDAP. Then click “Test connection”, you should see a green success message at the top, otherwise it means Keycloak cannot access your LDAP server.
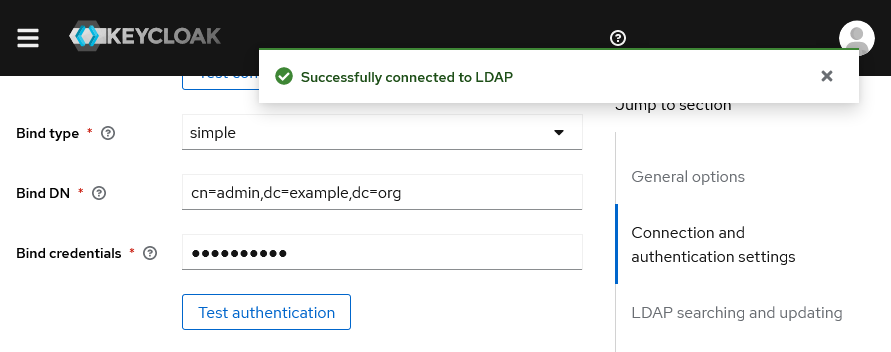
- Enter your service account credentials in the “Bind DN” and “Bind Credential” fields.
⚠ the “Bind DN” should be the full DN of the account, includingdcfields. - Now click “Test authentication” and again, hope to get a green success message.
- Now comes the tricky part 😁, fill in the “LDAP searching and updating” section:
- Select “UNSYNCED” for the “Edit mode”, which allows you to import LDAP users, modify them in Keycloak (typically, add the Olvid ID of users), and not sync anything back to your LDAP
- “Users DN” corresponds to the branch of your LDAP tree you want to import users from
- The “Username LDAP attribute” and other fields should be already pre-configured. Defaults are usually ok, but for
openldapsome changes might be needed. Below is a workingopenldapconfig - “User LDAP filter” can be used to further filter users based on specific attributes/group
- Select “Subtree” for the “Search Scope” to allow importing users not at the first level of the selected “Users DN”
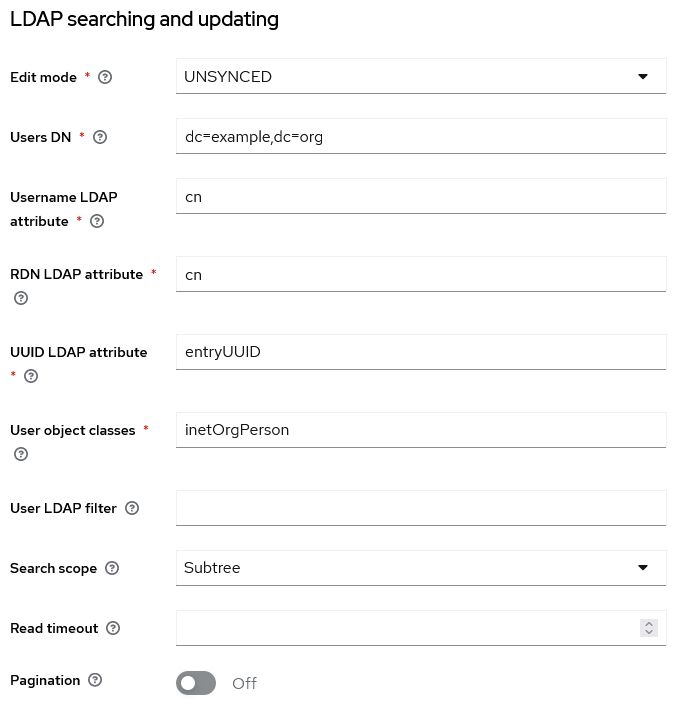
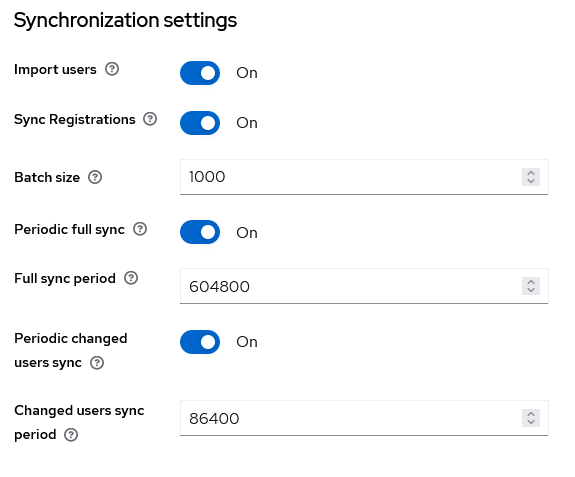
- Now scroll to the “Synchronization settings” section and, at least, activate the “Periodic Changed Users Sync”, with the frequency that best suits your needs (86400 is one day, 604800 is one week).
- Click the “Save” button at the bottom. An “Action” dropdown menu should appear at the very top right.
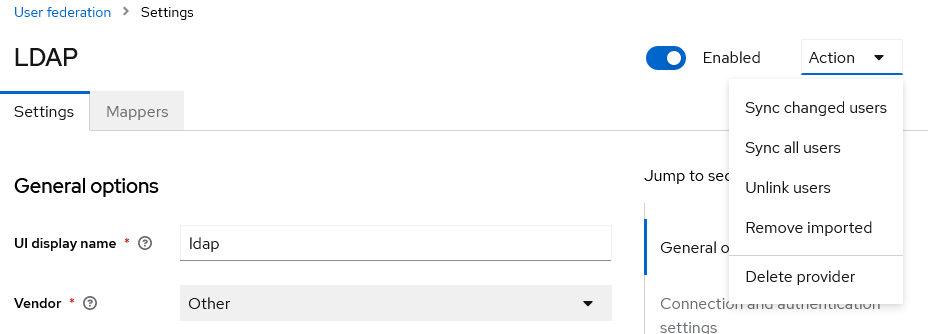
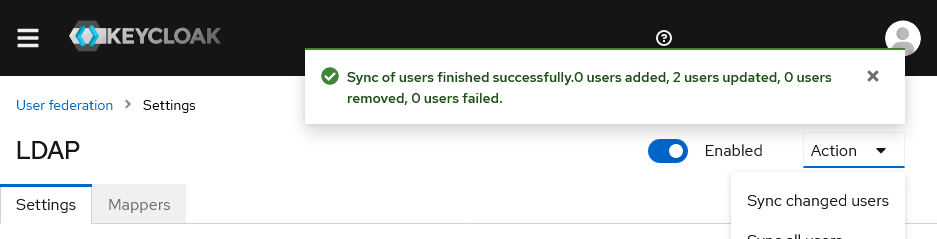
- You may click “Sync all users” to import your first batch of federated users, and hopefully get a green success message!
You may check the realm users list by clicking “Users” in the left menu. Federated users are not shown by default, so you should enter “*” in the “Search user” field and press enter. Your imported users should appear in the list.
1.1. Restricting user import to a specific LDAP group members
Sometimes, importing a whole subtree of users from your LDAP is not what you want. You may filter users based on any user attribute during the import. For example, you may create a specific LDAP group containing only the users you want to import, and then restrict user synchronization to this group. For this, user the “Filter” option in the LDAP configuration.
(memberOf=cn=group,ou=groups,dc=example,dc=org)
Of course, you should replace cn=group,ou=groups,dc=example,dc=org by the full DN of your group. Warning, this technique only works if groups are defined in your LDAP with membreOf attributes at the user level. If the groups are instead defined as a list user DNs in the member of the group itself, this will not work.
2. Customizing user import with mappers
By default, LDAP-imported users will only have a few “default” attributes synchronized: first name, last name, modification date, etc. Olvid offers two additional attributes that you may want to synchronize with Keycloak:
- the user’s company, using the
olvid-companyattribute - the user’s position, using the
olvid-positionattribute
These attributes can be set using LDAP Mappers as follows.
- open the “Mappers” tab and click the “Add mapper” button at the top
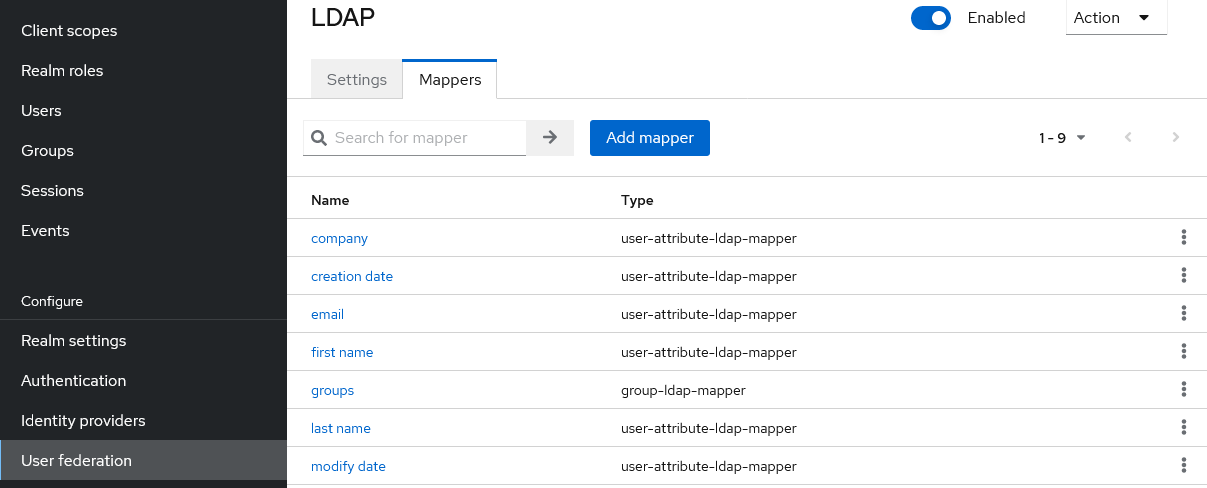
- Choose a name for your mapper, for example “company” and select the “Mapper type”. Two types are of particular interest:
- “user-attribute-ldap-mapper” allows to map an LDAP attribute to a Keycloak attribute
- “hardcoded-attribute-mapper” allows to add a hardcoded Keycloak attribute to all imported users
For the
olvid-companyattribute, we can go with a hardcoded attribute (assuming all Keycloak users belong to the same company):
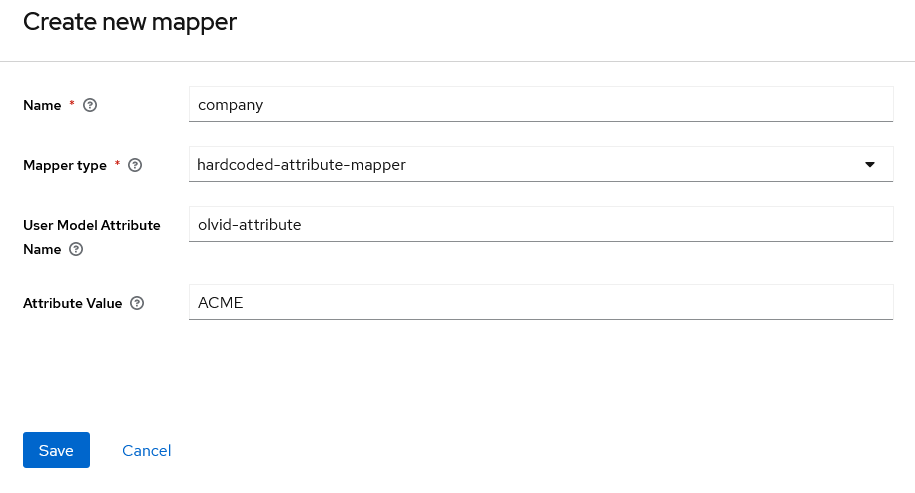
Then click “Save”
- For the position attribute we can use an ldap mapper as follows:
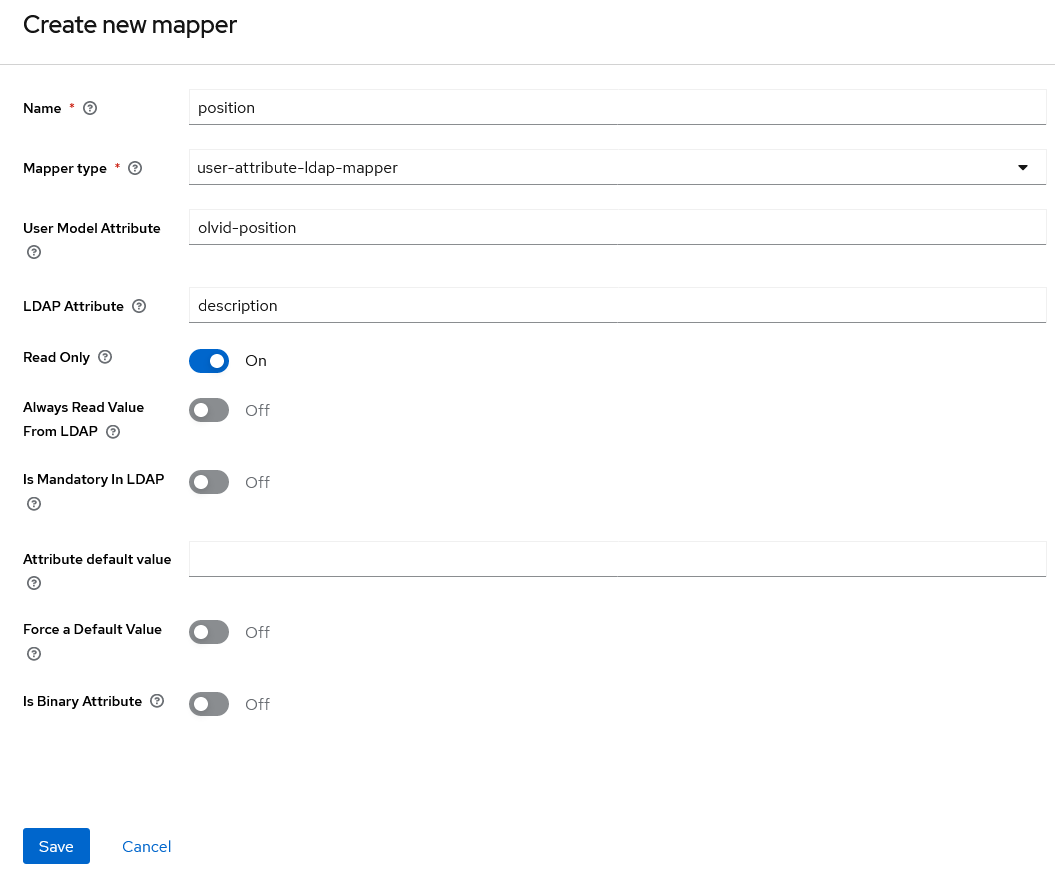
Here we assume the LDAP “description” attribute contains what we want to import, but this is probably something else in your directory. You may also specify a default value for users without this LDAP attribute, but this does not make a lot of sense for the position.
Click “Save” to save this mapper.
- Once all mappers are set, you may re-import all users by going back to the “Settings” tab and clicking the “Synchronize all users” button at the very bottom.
You can verify that your mappers work properly by going to the realm’s users list, entering “*” in the “Search user” field, selecting a user by clicking their ID and opening the “Attributes” tab. You should see the newly mapped field there:

3. Importing LDAP groups
The Keycloak LDAP user federation also offers the possibility to import groups into Keycloak. These groups can then be turned into Olvid discussions on the users’ devices (see the guide on Olvid Groups. However, contrary to groups created manually in the Olvid Management Console, these groups will be “locked”, meaning you will not be able to modify the group members on Keycloak, you will need to change them on the LDAP server. This is because whenever Keycloak needs to list the group members, it will query the LDAP server to get the most up-to-date members list.
Configuring LDAP group import is simply done through a mapper, and offers only few customization options.
- From your LDAP user federation configuration, open the “Mappers” tab and click the “Add mapper” button
- Choose a name for this mapper and select the mapper type “group-ldap-mapper”
- Like for users, fill in the “LDAP Groups DN” with the top-most DN containing all the groups you want to import. You may also filter which groups to import with the “LDAP Filter” field.
- For the “Mode”, choose “READ_ONLY”
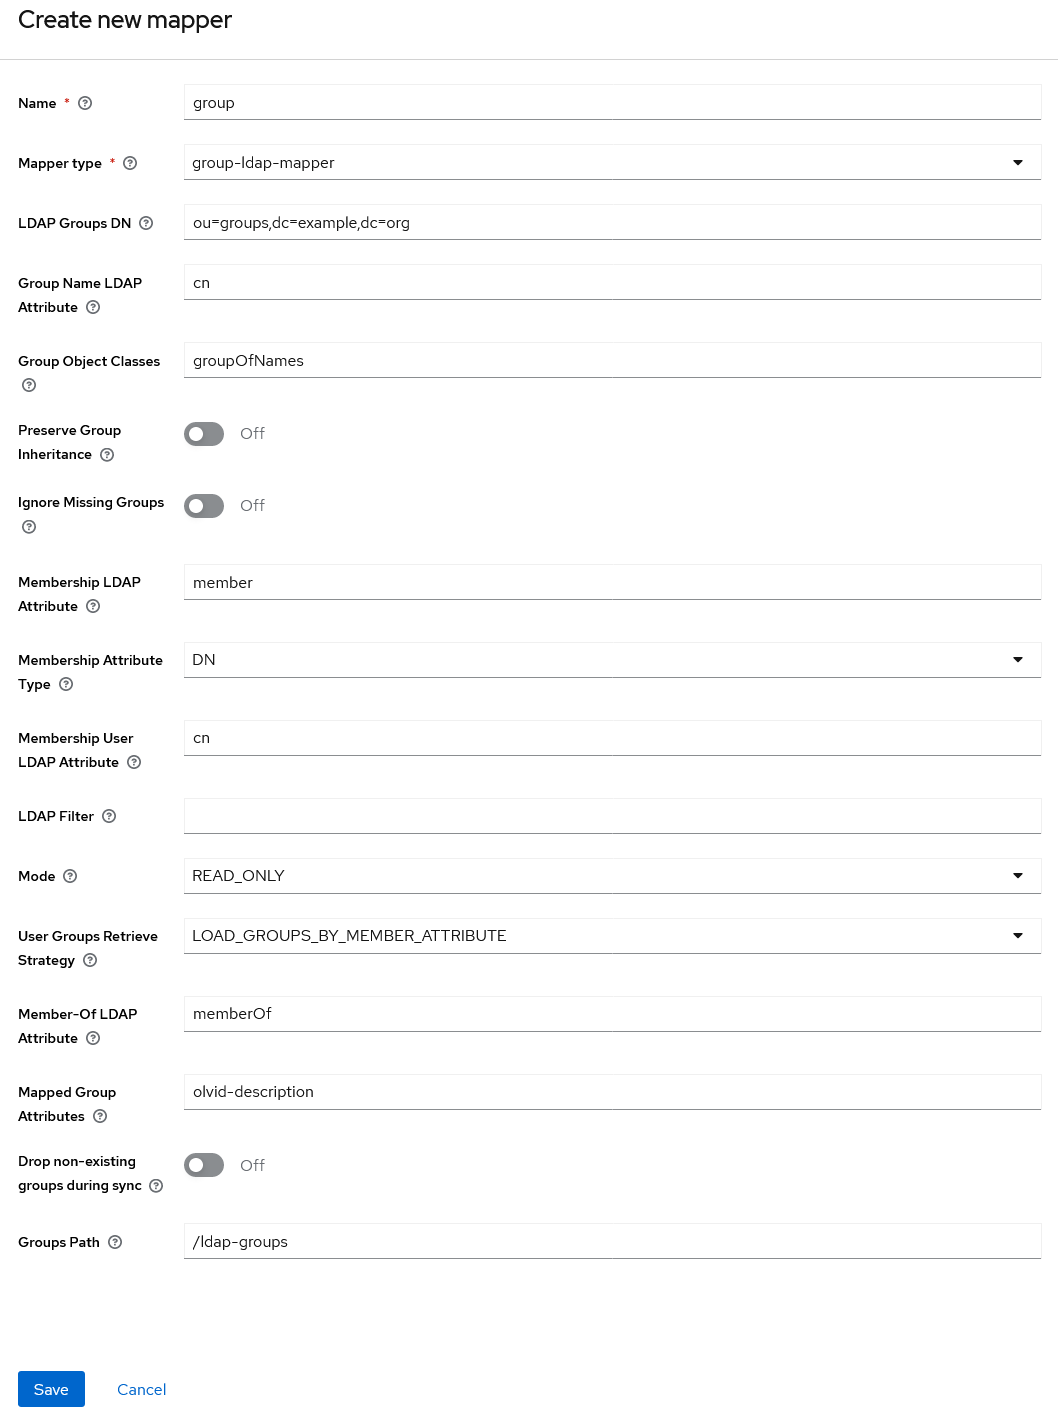
- Fill in the different parameters depending on how group membership is defined on your LDAP server
-
The “Mapped Group Attributes” field allows to list a set of group attributes to import from LDAP groups. Contrary to what is possible with user mappers, these fields cannot be renamed inside Keycloak. Two fields are of particular interest:
olvid-descriptionandolvid-namewhich correspond to the group description and group name that will be displayed in Olvid. If noolvid-nameis provided, the group’s name (by default the LDAP group’scn) is used.If you want to control these attributes from inside your LDAP, you will need to create new LDAP attributes with this particular name and add them to the list of “Mapped Group Attributes”
-
The “Group Path” fields allows to configure where your LDAP groups are synchronized in keycloak. We recommend not importing your groups at the root of the group tree but rather creating a specific group, something like “ldap-groups”, as the parent. If you decide to use such a “Group Path”, you will need to manually create the group in Keycloak before being able to save the configuration. You may open the “Groups” section in the left menu in another tab to create this group.
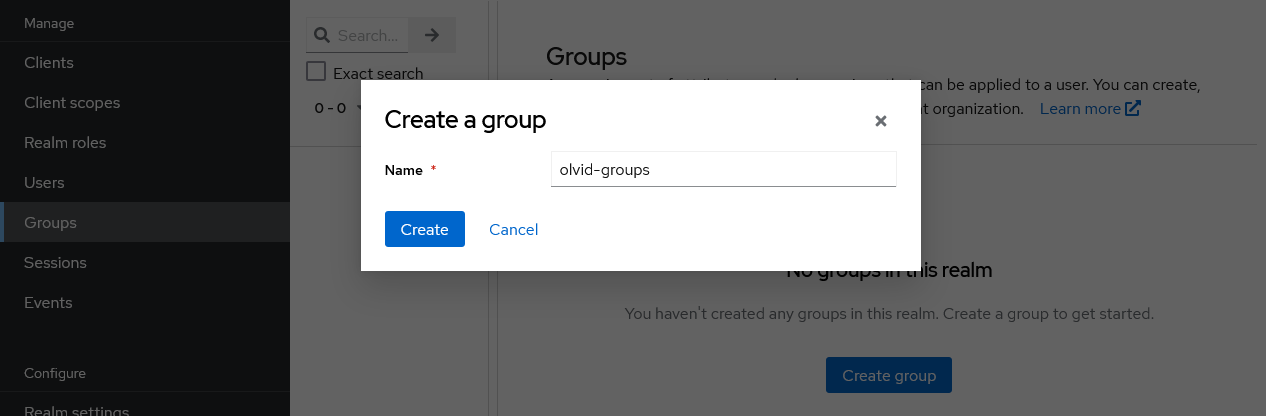
There is one special group that may be of interest: if you create a group named
olvid-groupsat the root of the Keycloak group tree, any subgroup of this group will automatically become an Olvid discussion. Otherwise, groups imported from LDAP will only become Olvid discussions if you activate this option manually for each of them. A “Group Path” equal to/olvid-groupsmay thus be of interest.
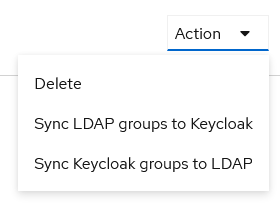
- Once all the fields are properly set, you can press “Save”
- An “Action” dropdown appears at the top of the page: click “Sync LDAP groups to Keycloak” to synchronize your groups. A green confirmation popup will let you know how many groups were imported.