Table of Contents
- Base Installation
- Prerequisites
- Installation of Keycloak
- Configuration of Keycloak
- Configuration of the Olvid Plugin
- Upgrading
- Additional Configuration
- Configuration of an External IdP
- Using LDAP User Federation
- x509 Client Certificates Authentication
- Configure Olvid via an MDM
- Using the management console
- Use the Olvid Management Console
- Misc.
- Changelog
Configuration of the Olvid Plugin
The last step is to configure the Olvid Plugin and generate the link Olvid users will use to bind their identity to the Keycloak server.
Start by opening the Olvid Management Console by clicking the Management Console link from within the Keycloak console.
Here we describe the minimal steps to allow Olvid users to connect, more details about the various functionalities of the Olvid Management Console will be added in the pages under Using the Management Console in the left menu.
1. Realms configuration
-
Open the Realms Configuration page from the left menu

This page lets you configure which realm is used for the console administration and which realms are used by Olvid users:
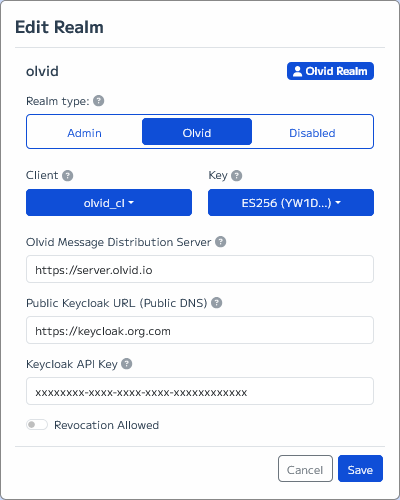
- Press the ✏️ Edit button for the
olvidrealm and- move the main switch to Olvid
- select olvid_cl from the Client dropdown
- select ES256 from the Key dropdown
- enter
https://server.olvid.iofor the Olvid Message Distribution Server (without any trailing /) - enter the actual Public Keycloak URL your users need to connect to. This is the public DNS through which your Keycloak server can be reached and could be something like
https://keycloak.org.com -
enter the Keycloak API Key provided by the Olvid team
Be sure to only use the Keycloak API key on a single server. If you need to deploy multiple Keycloak servers with different Olvid user realms, please request multiple API keys from the Olvid team, otherwise you will run into issues 😅
- the Revocation Allowed switch should remain off: enabling it will allow Olvid users to overwrite a public key that was already associated to their account on Keycloak. This is convenient when debugging but can be a security risk if a user’s Keycloak credential get compromised.
-
press Save
As soon as some users have enrolled their Olvid profile on this Keycloak server, changing any of these parameters may require them to completely re-enroll. You should normally never change these settings once everything is working!
-
Press the ✏️ Edit button for the
olvid_adminrealm, move the main switch to Admin, and press Save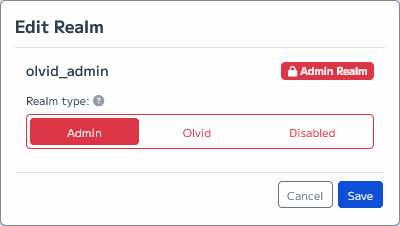
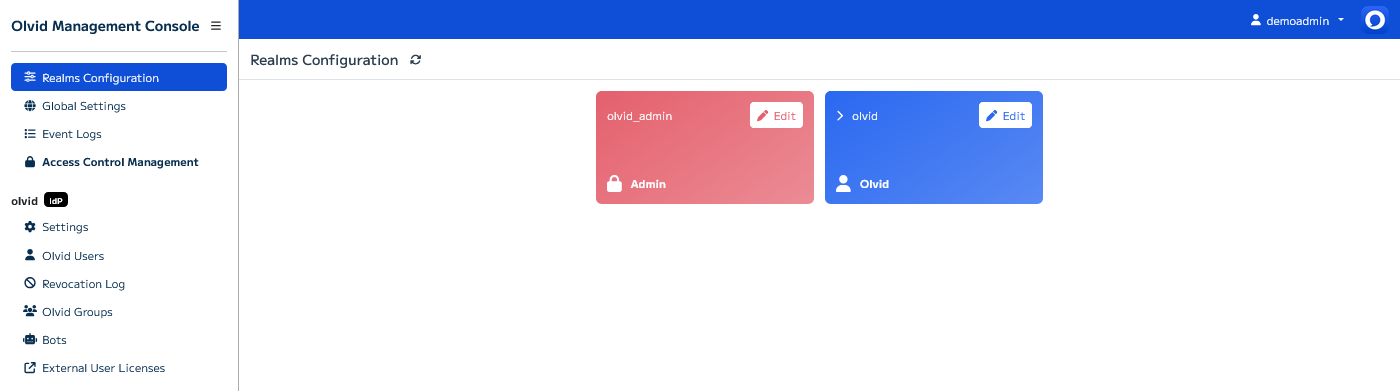
The Olvid Management Console should now display something similar to this:
2. Test your configuration
The Olvid Management Console is composed of multiple pages:
- Realms Configuration allows choosing the user and admin realms as in the previous step. You probably won’t need to access it anymore.
- Global Settings should contain some settings in a future update 😁 For now it allows manually running (with a few seconds delay) some periodic tasks performed by Keycloak.
- Event Logs gives you a view of all administration events that occurred inside the Olvid Management Console.
- Access Control Management allows managing users of the
olvid_adminrealm. These users can log into the Olvid Management Console by going to the/auth/olvid/url on the server
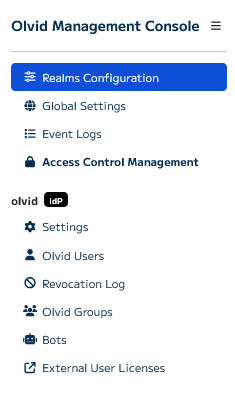
For each user realm (here, only the olvid realm), you have access to the following pages
- Settings allows configuring some settings but mostly gives access to the precious Configuration Link needed for Olvid to connect to your Keycloak server.
- Olvid Users allows manually managing users in this realm.
- Olvid Groups lets you create and manage groups and decide which Keycloak groups should be pushed to users as Olvid discussions.
- Visibility Circles lets you configure visibility rules between users so that some users may see everyone, but other don’t.
- Bots must first be enabled on the Settings page and allows enrolling Olvid Bots in Keycloak.
- Revocation Log contains the list of users that were revoked using the Olvid Management Console.
- External User Licenses allows you to generate license activation links you can distribute to people outside your organisation to grant them access to premium Olvid features.
For now, open the Settings page, this is where you will find the link you should distribute to Olvid users
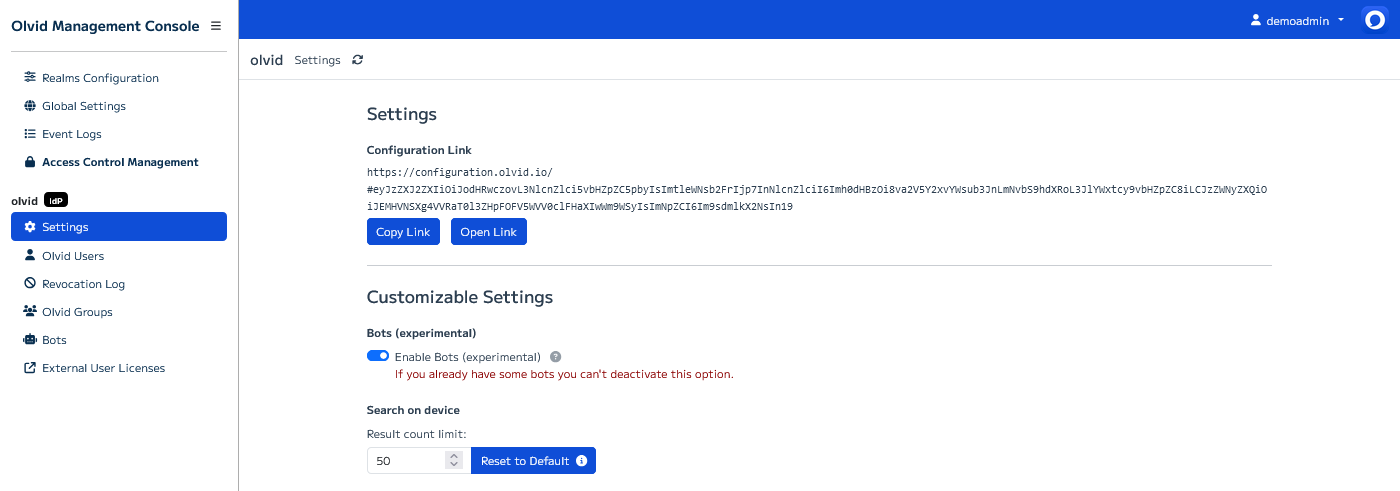
The Configuration Link url should be similar to:
https://configuration.olvid.io/#eyJzZXJ2ZXIiOiJodHR [….] SyZCI6Im9sdmlkX2NsIn19
Press the Open Link button to open the configuration page which should look something like this:
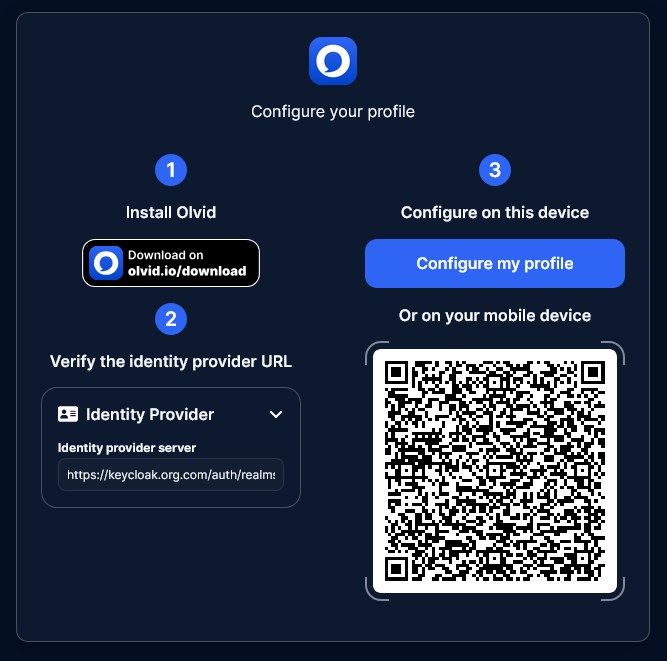
That’s it, the Olvid plugin is configured, and you should be able to authenticate as the test user you created after opening this link inside Olvid or scanning the QR code shown on the page with a mobile device.
If you want, enable authentication based on Olvid cryptographic key
Since version 4.6.0, Olvid’s keycloak plugin supports user re-authentication based on a user’s Olvid cryptographic key.
- The first time a user authenticates they upload they Olvid public key to the server.
- This public key can then be used to re-authenticate the user without ever asking them to enter a password.
- Also, when a user adds a new device, this new device is automatically authenticated with Keycloak.
If you are interested in this possibility, this option must be manually enabled in the Settings page. Note that is it also a prerequisite for magic link authentication.